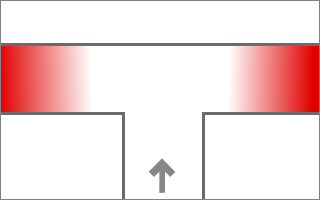
The image above shows a common example for a T-intersection: a hallway continues left and right side at the same time, at both sides in a 90° angle.
For a single operator this an extremely dangerous situation: he must clear 2 danger zones in opposing directions at the same time. But when he focuses his eyes and weapon to the left, the right side will be exposed and uncovered. And vice versa.
As in many situations, proper teamwork is a far better solution. Good synchronisation allows a team to clear such a situation relatively safe:
- Pointman (#1) or Element-Leader calls out “T-intersection”, or just “T”, to initialize the movement.
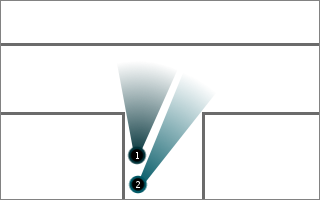
- Coverman (#2) moves to the opposing side of the Pointman (left in this case). Further available operators should cover other danger zones if present, or standby with tacaids (e.g. a flashbang) to support #1 and #2 if necessary.
- Pointman and Coverman scan their respective corner carefully: left operator scans right corner, right operator scans left corner. Be careful to not expose your back during the scan, and warn your partner if he gets too close to the corner at his side.
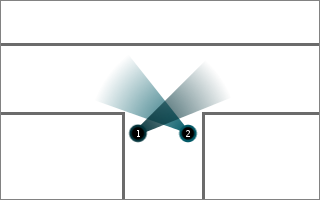
- Both report their corner clear when the scan is done (simple “left/right clear.”).
- One operator, usually the Pointman, starts a countdown and then both operators breach their respective corner fast and simultaneously! This step is critical: if the two operators do not move synchronized, one will expose his back to an uncovered area and can easily get shoot.
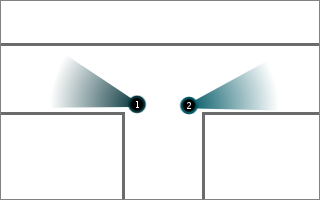
- At this point the responsibilities swap: the left operator covers the left side and the right operators covers the right side. You can use the corner or other objects as cover, but in any case make sure that your side is really clear. Otherwise your partner might easily get shoot in his exposed back.
- Both operators report their side clear, or engage threats as necessary. The team can proceed to one direction or split up as needed.
- This procedure can be used whenever there are at least 2 danger zones in opposing directions and enough space for 2 operators to conduct the movement, no matter whether you operate within a building or between buildings in urban terrain.
- A 4-way intersection can be cleared in the same manner, just with at least one additional operator covering the front (12 oc).
- In urban areas the available space usually allows to conduct this movement with one maneuver team at each side (or even a whole fire-team). This makes it easier to cover additional danger zones like windows or rooftops.
|